linux
Trace 某 Linux process 的 環境變數 environ
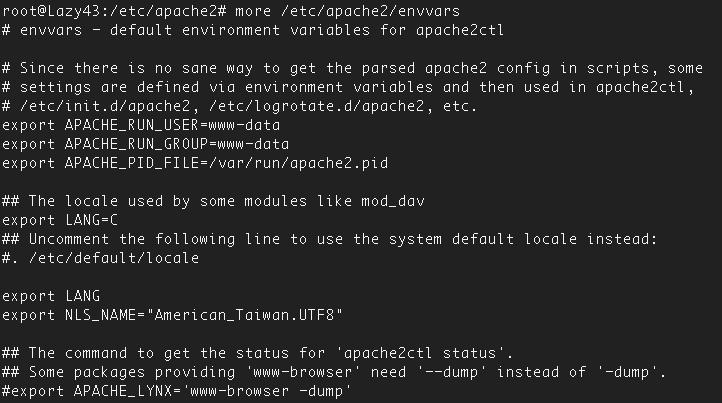
Lazy 的 apache 有作這個設定
export NLS_NAME=”American_Taiwan.UTF8″
838 cd /proc/
840 ps auwwx|grep apache <– 找一個 apache 的 process id , ex: 21192
841 cd 21192
843 cat environ <– 把環境變數列出來
.

Amazon / AWS / EC2 linux version
cat /proc/version
Linux version 2.6.35.11-83.9.amzn1.x86_64 ([email protected]) (gcc version 4.4.4 20100726 (Red Hat 4.4.4-13) (GCC) ) #1 SMP Sat Feb 19 23:42:04 UTC 2011
file /bin/bash
/bin/bash: ELF 64-bit LSB executable, x86-64, version 1 (SYSV), dynamically linked (uses shared libs), for GNU/Linux 2.6.18, stripped
cat /proc/cpuinfo
processor	: 0
vendor_id	: GenuineIntel
cpu family	: 6
model		: 23
model name	: Intel(R) Xeon(R) CPU           E5430  @ 2.66GHz
stepping	: 10
cpu MHz		: 2659.998
cache size	: 6144 KB
fpu		: yes
fpu_exception	: yes
cpuid level	: 13
wp		: yes
flags		: fpu tsc msr pae cx8 cmov pat pse36 clflush dts mmx fxsr sse sse2 ss ht pbe syscall nx lm constant_tsc up arch_perfmon pebs bts rep_good aperfmperf pni dtes64 monitor ds_cpl vmx est tm2 ssse3 cx16 xtpr pdcm dca sse4_1 lahf_lm tpr_shadow vnmi flexpriority
bogomips	: 5319.99
clflush size	: 64
cache_alignment	: 64
address sizes	: 38 bits physical, 48 bits virtual
power management:
login remote ssh delay 等很久
改 /etc/ssh/sshd_config
加一行:
UseDNS no
amazon aws ami LAMP / NGINX / PHP / memcache steps
// —–
Using NGINX + PHP5-FPM
sudo apt-get install nginx php5-fpm php5-mysql
cd /etc/init.d/
sudo service apache2 stop
sudo update-rc.d -f apache2 remove

http://yoodey.com/how-install-configure-nginx-php-fpm-memcached-work-drupal-7-ubuntu-1010-maverick


Install Memcached
sudo apt-get install memcached libmemcached-dev php5-memcached php5-memcache
// ====================
Getting a new virtual machine up and running from the default AMI is easy.  Here’s my cookbook:
Install basic services

    yum install mysql mysql-server mysql-devel
    yum install httpd httpd-devel
    yum install php php-devel php-mysql php-gd php-dom php-pear php-json
    yum install svn

Configure those services to start at boot

    chkconfig –level 345 httpd on
    chkconfig –level 345 mysqld on
    chkconfig –list

Install APC

I couldn’t find a package, and this bug report explains why we have to use the beta.

    yum install gcc pcre-devel
    pecl install apc-beta
    echo extension=apc.so > /etc/php.d/apc.ini

Install memcached

    yum install libevent libevent-devel
    curl -O http://memcached.googlecode.com/files/memcached-1.4.5.tar.gz
    cd memcached-1.4.5
    ./configure
    make ; make install
    /usr/local/bin/memcached -u nobody -d -m 30 -l 127.0.0.1 -p 11211


// ----
<pre>
[root@ip-10-130-9-23 log]# cat /etc/fstab
#
LABEL=/     /           ext4    defaults,noatime  1   1
tmpfs       /dev/shm    tmpfs   defaults        0   0
devpts      /dev/pts    devpts  gid=5,mode=620  0   0
sysfs       /sys        sysfs   defaults        0   0
proc        /proc       proc    defaults        0   0
[root@ip-10-130-9-23 log]# cat /etc/mtab
/dev/xvda1 / ext4 rw,noatime 0 0
proc /proc proc rw 0 0
sysfs /sys sysfs rw 0 0
devpts /dev/pts devpts rw,gid=5,mode=620 0 0
tmpfs /dev/shm tmpfs rw 0 0
none /proc/sys/fs/binfmt_misc binfmt_misc rw 0 0

</pre>
Ubuntu Linux : install .deb packages
sudo dpkg -i package_name
[monster] monster.tw 記錄 / memo / ubuntu / 裝 圖形介面 / GUI / gnome desktop / ip address / setting
昨天晚上去一位朋友公司幫忙用他們的 server , 回來就想要做幾件事:
1. 記錄一下自己的 server 某些重要檔案, 也可供其他人參考
2. 備份重要 file
3. 隨時準備好最新版的救援CD/Live CD/Live USB , 最新版的 Monster LAMP pack 也要燒好收著.
4. 準備一個 “萬用” 含各類 driver 的 linux kernel , 以供救援使用.
5. 搞懂 booting steps / GRUB setting

root@park:~# cat /etc/fstab
# /etc/fstab: static file system information.
#
# Use 'vol_id --uuid' to print the universally unique identifier for a
# device; this may be used with UUID= as a more robust way to name devices
# that works even if disks are added and removed. See fstab(5).
#
#

proc            /proc           proc    defaults        0       0
# / was on /dev/sda1 during installation
UUID=46312252-8925-4e60-ab5f-af240b4b440f /               ext3    relatime,errors=remount-ro 0       1
# swap was on /dev/sda5 during installation
UUID=bf9a64f1-3eb8-433c-8311-8d971be82dc2 none            swap    sw              0       0
/dev/scd0       /media/cdrom0   udf,iso9660 user,noauto,exec,utf8 0       0
service / daemon 管理工具
sysv-rc-conf text based utility :
sudo apt-get install sysv-rc-conf
另一套 GUI
sudo apt-get install gnome-system-tools gdm
monster.tw 是裝這個 apt-get install rcconf
列出 runlevels 的 program : chkconfig
裝 圖形介面 / GUI / gnome desktop
sudo apt-get install ubuntu-desktop --no-install-recommends
啟動 desktop manager :
/etc/init.d/gdm start
stop x server / 關掉 x window: /etc/init.d/gdm stop
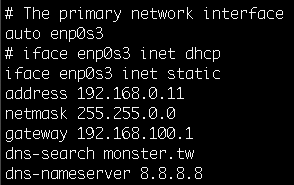
改 IP address
cat /etc/network/interfaces
# This file describes the network interfaces available on your system
# and how to activate them. For more information, see interfaces(5).

# The loopback network interface
auto lo
iface lo inet loopback

# The primary network interface
auto eth0
iface eth0 inet static
        address 172.30.0.42
        netmask 255.255.255.0
        network 172.30.0.0
        broadcast 172.30.0.255
        gateway 172.30.0.1
        # dns-* options are implemented by the resolvconf package, if installed
        dns-nameservers 8.8.8.8
        dns-search monster.tw
重新啟動 networking
/etc/init.d/networking restart
若要使用 DHCP 的話
auto eth0
iface eth0 inet dhcp
加上 default route
gateway 1.2.3.4
或另一個 static route
up route add -net 1.2.3.0 netmask 255.255.255.0 gw 1.2.3.4
change host name:
改 /etc/hostname
改 /etc/hosts

若是用 vmware 之類的軟體導致 clone 出來的 ubuntu 網路 interface 跑掉, 可以砍掉
/etc/udev/rules.d/70-persistent-net.rules
後 reboot , 就可以解決了.