gentoo
gentoo emerge command
升級系統/世界
emerge -uDN system ( world )
升級完世界 把多餘的東西砍掉
emerge --depclean
檢查 library 一致?
revdep-rebuild
用vmware , frame buffer I/O很慢 , 要加 -q
安裝被keywords mark起來的ebuild
把 ebuild 名稱加到 /etc/portage/package.keywords 就可以了
在 /etc/make.conf 加 ACCEPT_KEYWORDS=”~amd64″
裝特定版本的 package
emerge =www-servers/apache-2.x.x
cd /
mount -t proc proc /mnt/gentoo/proc
mount -o bind /dev /mnt/gentoo/dev
cp -L /etc/resolv.conf /mnt/gentoo/etc/
chroot /mnt/gentoo /bin/bash
env-update && source /etc/profile
[gentoo] 排除舊的 lib 相容問題
 * Messages for package sys-devel/libtool-2.2.6b:

 * Old versions of installed libraries were detected on your system.
 * In order to avoid breaking packages that depend on these old libs,
 * the libraries are not being removed.  You need to run revdep-rebuild
 * in order to remove these old dependencies.  If you do not have this
 * helper program, simply emerge the 'gentoolkit' package.
 *
 *   # revdep-rebuild --library libltdl.so.3
 *
 * Once you've finished running revdep-rebuild, it should be safe to
 * delete the old libraries.  Here is a copy & paste for the lazy:
 *   # rm '/usr/lib64/libltdl.so.3'
下了 revdep-rebuild –library libltdl.so.3 會
 * Configuring search environment for revdep-rebuild

 * Checking reverse dependencies
 * Packages containing binaries and libraries using libltdl.so.3
 * will be emerged.

 * Collecting system binaries and libraries
 * Generated new 1_files.rr
 * Checking dynamic linking
[ 55% ]  *   found /usr/lib64/apache2/modules/libphp5.so
[ 80% ]  *   found /usr/lib64/php5/bin/php
[ 100% ]
 * Generated new 3_broken.rr
 * Assigning files to packages
 *   /usr/lib64/apache2/modules/libphp5.so -> dev-lang/php
 *   /usr/lib64/php5/bin/php -> dev-lang/php
 * Generated new 4_raw.rr and 4_owners.rr
 * Cleaning list of packages to rebuild
 * Generated new 4_pkgs.rr
 * Assigning packages to ebuilds
 * Generated new 4_ebuilds.rr
 * Evaluating package order
 * Generated new 5_order.rr
 * All prepared. Starting rebuild
emerge --oneshot  dev-lang/php:5
..........
[monster] monster.tw 記錄 / memo / ubuntu / 裝 圖形介面 / GUI / gnome desktop / ip address / setting
昨天晚上去一位朋友公司幫忙用他們的 server , 回來就想要做幾件事:
1. 記錄一下自己的 server 某些重要檔案, 也可供其他人參考
2. 備份重要 file
3. 隨時準備好最新版的救援CD/Live CD/Live USB , 最新版的 Monster LAMP pack 也要燒好收著.
4. 準備一個 “萬用” 含各類 driver 的 linux kernel , 以供救援使用.
5. 搞懂 booting steps / GRUB setting

root@park:~# cat /etc/fstab
# /etc/fstab: static file system information.
#
# Use 'vol_id --uuid' to print the universally unique identifier for a
# device; this may be used with UUID= as a more robust way to name devices
# that works even if disks are added and removed. See fstab(5).
#
#

proc            /proc           proc    defaults        0       0
# / was on /dev/sda1 during installation
UUID=46312252-8925-4e60-ab5f-af240b4b440f /               ext3    relatime,errors=remount-ro 0       1
# swap was on /dev/sda5 during installation
UUID=bf9a64f1-3eb8-433c-8311-8d971be82dc2 none            swap    sw              0       0
/dev/scd0       /media/cdrom0   udf,iso9660 user,noauto,exec,utf8 0       0
service / daemon 管理工具
sysv-rc-conf text based utility :
sudo apt-get install sysv-rc-conf
另一套 GUI
sudo apt-get install gnome-system-tools gdm
monster.tw 是裝這個 apt-get install rcconf
列出 runlevels 的 program : chkconfig
裝 圖形介面 / GUI / gnome desktop
sudo apt-get install ubuntu-desktop --no-install-recommends
啟動 desktop manager :
/etc/init.d/gdm start
stop x server / 關掉 x window: /etc/init.d/gdm stop
改 IP address
cat /etc/network/interfaces
# This file describes the network interfaces available on your system
# and how to activate them. For more information, see interfaces(5).

# The loopback network interface
auto lo
iface lo inet loopback

# The primary network interface
auto eth0
iface eth0 inet static
        address 172.30.0.42
        netmask 255.255.255.0
        network 172.30.0.0
        broadcast 172.30.0.255
        gateway 172.30.0.1
        # dns-* options are implemented by the resolvconf package, if installed
        dns-nameservers 8.8.8.8
        dns-search monster.tw
重新啟動 networking
/etc/init.d/networking restart
若要使用 DHCP 的話
auto eth0
iface eth0 inet dhcp
加上 default route
gateway 1.2.3.4
或另一個 static route
up route add -net 1.2.3.0 netmask 255.255.255.0 gw 1.2.3.4
change host name:
改 /etc/hostname
改 /etc/hosts

若是用 vmware 之類的軟體導致 clone 出來的 ubuntu 網路 interface 跑掉, 可以砍掉
/etc/udev/rules.d/70-persistent-net.rules
後 reboot , 就可以解決了.
gentoo linux ifconfig
ifconfig eth0 ${IP_ADDR} broadcast ${BROADCAST} netmask ${NETMASK} up
查主機溫度
cat /proc/acpi/thermal_zone/THRM/temperature
kernel 要把 I2O 編進去
裝新的 www.monster.com.tw 過程記錄
2009.0724 emerge 這些 packages:
time emerge -av gentoo-sources lilo vim bind vixie-cron syslog-ng dhcpcd xfsprogs openssh samba net-fs/nfs-utils portmap postfix screen ntp cronolog net-mail/mpack app-arch/sharutils unzip net-dns/bind net-dns/bind-tools net-ftp/ftp net-misc/netkit-telnetd net-analyzer/trafshow net-analyzer/tcpdump net-analyzer/traceroute
kernel compile options
<*> Serial ATA (prod) and Parallel ATA (experimental) drivers —>
<*> Intel ESB, ICH, PIIX3, PIIX4 PATA/SATA support
CONFIG_ATA_PIIX:
This option enables support for ICH5/6/7/8 Serial ATA
and support for PATA on the Intel ESB/ICH/PIIX3/PIIX4 series
host controllers.
[*] Ethernet (1000 Mbit) —>
<*> Realtek 8169 gigabit ethernet support
oasis ~ # uname -a
Linux oasis 2.6.29-gentoo-r5 #3 SMP PREEMPT Mon Jul 27 11:39:51 CST 2009 x86_64 Intel(R) Atom(TM) CPU 330 @ 1.60GHz GenuineIntel GNU/Linux
oasis ~ # file /bin/bash
/bin/bash: ELF 64-bit LSB executable, x86-64, version 1 (SYSV), for GNU/Linux 2.6.9, dynamically linked (uses shared libs), stripped
make.conf
CFLAGS="-O2 -pipe"
CXXFLAGS="-O2 -pipe"

CHOST="x86_64-pc-linux-gnu"

USE="mmx sse sse2 -cups -ipv6 ssl apache2 berkdb cjk cli crypt curl gd gdbm iconv mysql mysqli ncurses nls pcre readline reflection session spell spl truetype unicode xml zlib ssl hash calendar json simplexml"
hdparm -tT /dev/sda
/dev/sda:
Timing cached reads: 1080 MB in 2.00 seconds = 539.97 MB/sec
Timing buffered disk reads: 196 MB in 3.01 seconds = 65.19 MB/sec
processor       : 3
vendor_id       : GenuineIntel
cpu family      : 6
model           : 28
model name      : Intel(R) Atom(TM) CPU  330   @ 1.60GHz
stepping        : 2
cpu MHz         : 1596.135
cache size      : 512 KB
physical id     : 0
siblings        : 4
core id         : 0
cpu cores       : 2
apicid          : 1
initial apicid  : 1
fpu             : yes
fpu_exception   : yes
cpuid level     : 10
wp              : yes
flags           : fpu vme de pse tsc msr pae mce cx8 apic sep mtrr pge mca cmov pat clflush dts acpi mmx fxsr sse sse2 ss ht tm pbe syscall nx lm constant_tsc arch_perfmon pebs bts rep_good pni dtes64 monitor ds_cpl tm2 ssse3 cx16 xtpr pdcm lahf_lm
bogomips        : 3192.15
clflush size    : 64
cache_alignment : 64
address sizes   : 32 bits physical, 48 bits virtual
power management:
gcc --version gcc (Gentoo 4.3.2-r3 p1.6, pie-10.1.5) 4.3.2

php --version
PHP 5.2.10-pl0-gentoo (cli) (built: Aug  7 2009 19:23:18)
Copyright (c) 1997-2009 The PHP Group
Zend Engine v2.2.0, Copyright (c) 1998-2009 Zend Technologies

mysql --version
mysql  Ver 14.12 Distrib 5.0.67, for unknown-linux-gnu (x86_64) using readline 5.1
with
senna-1.1.4.tar.gz
tritonn-1.0.12-mysql-5.0.67.tar.gz
裝 dev-php5/pecl-memcache 有點問題
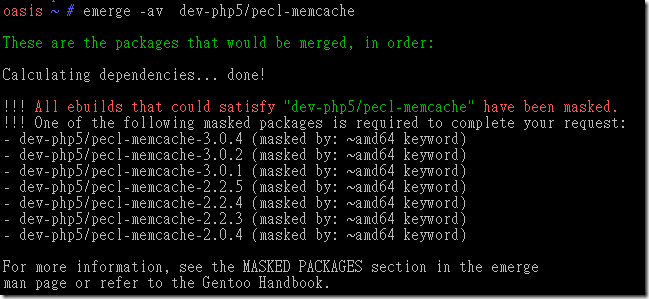
解決:
在 /etc/portage/package.keywords 加上
dev-php5/pecl-memcache
在 gentoo 裝 oracle sqlplus package
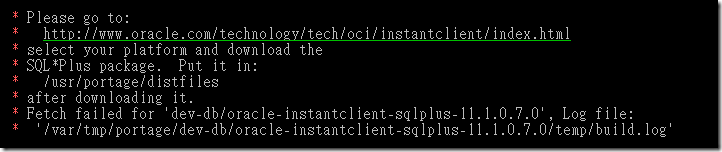
去 Oracle 那邊 download 
那個 instantclient-sqlplus-linux32-11.1.0.7.zip
放到 /usr/portage/distfiles
下 emerge -av dev-db/oracle-instantclient-sqlplus
gentoo NFS
在 gentoo 要裝 NFS client 要裝
emerge -av net-fs/nfs-utils portmap

/etc/init.d/portmap start

EDIT: /etc/fstab 加一行
freenas.monster.tw:/mnt/data/public     /m1 nfs rw,addr=172.30.0.xx    0 0

有 showmount 可以看 NFS 有 export 那些 directory 出來