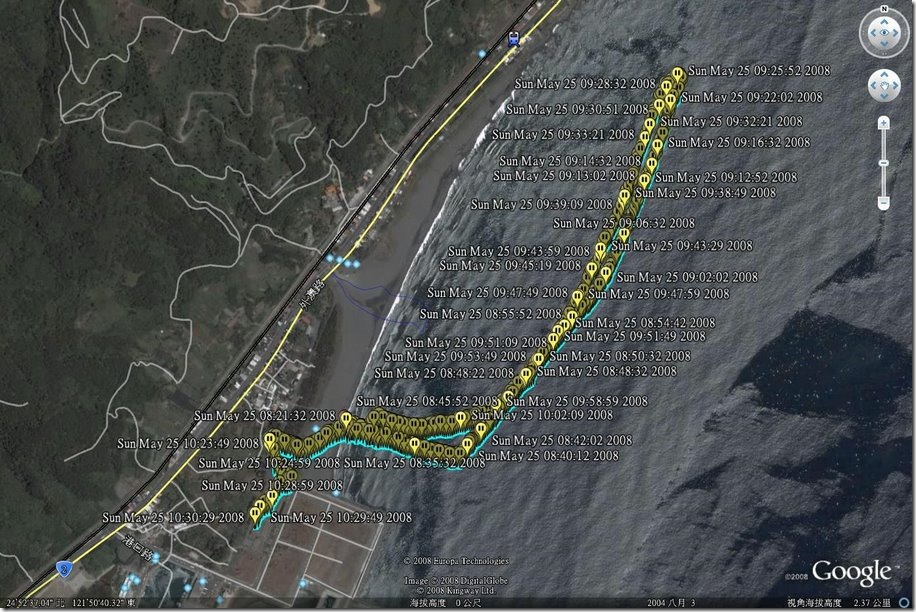
報名時主辦單位寫距離是 4KM , 可是由 Google Earth 量出來僅有 2811M
今天天氣: 早上有太陽偶爾有雲, 下午是雷陣雨
int fnSetTimeout(int timeout) {
  char **row;
  char sql[100];
  char data[200];

  sprintf(sql,"set session wait_timeout=%d",timeout);
  if ( mysql_real_query( &mysql, sql, strlen(sql) ) ) {
    printf("FAILED : %s\n",sql);
    exit(3);
  }

  sprintf(sql,"set session interactive_timeout=%d",timeout);
  if ( mysql_real_query( &mysql, sql, strlen(sql) ) ) {
    printf("FAILED : %s\n",sql);
    exit(3);
  }

  strcpy(sql,"select @@session.interactive_timeout" );
  if ( mysql_real_query( &mysql, sql, strlen(sql) ) ) {
    printf("FAILED : %s\n",sql);
    exit(3);
  }

  if ( (result=mysql_store_result(&mysql)) != NULL ) {
    row=mysql_fetch_row(result);
    strcpy( data, row[0] );
    mysql_free_result( result );
    timeout=atoi(data);
  } else {
    timeout=0;
  }

  return(timeout);
}
主要的功能是使用 if= (輸入檔) 及 of= (輸出檔)。預設 dd會自stdin讀取,並寫入stdout中。以下為一些 dd的使用範例:
將硬碟直接備份到另外一顆硬碟
# dd if=/dev/hda of=/dev/sda conv=noerror,sync bs=4k
這個命令常用來將(/dev/hda)直接備份至(/dev/sda)磁碟。(通常裝置名稱/dev/hda為IDE硬碟,而/dev/sda常是USB儲存碟。)這個指令只有在磁碟有足夠夠空間儲存來源磁碟的整個檔案系統時才能使用。其優點是你不必將磁碟掛上來進行備分, and the only reference to hda is in /dev and in the command which is usually in a script in cron.
其中的參數”bs=4k”是用來指定拷貝中所用block的大小。dd指令預設中為512 bytes:使用小的block會明顯地導致拷貝速度變慢。然而,使用大的block則可能會在遇到錯誤時,block其餘部分都被填入zero-bytes。因此,如果你在拷貝一個有問題的裝置時增加你的block大小,你可能會遺失較多的data,雖然你可以花較短的時間在嘗試讀取破損的磁區。其他工具如dd_rescue 與 dd_rhelp 可在這種情況下提供更為彈性的解決方案,在無錯誤的磁區得以大block的速度進行,而有問題的區域則採小block拷貝。
建立硬碟的映像檔
# dd if=/dev/hda | gzip > /mnt/hdb1/system_drive_backup.img.gz
在此處,用dd 來製作一個第一部硬碟的影像檔,並且將其結果導入gzip壓縮程式。其產生的壓縮結果則被置於另一磁碟的一個檔案中。反向的程序方法:
# gzip -dc /mnt/hdb1/system_drive_backup.img.gz | dd of=/dev/hda
如此,gzip加上-d的參數可以解壓這個備份檔,再把結果傳至stdout (用參數 -c ),以 pipe 傳入dd並寫至 /dev/hda。
拷貝軟碟
# dd if=/dev/fd0 of=/tmp/floppy.img bs=10240
這將會將軟碟的內容拷貝為一個檔案,然後如果要把這個影像檔於到一片新的軟碟片上,把 “if” 與 “of” 兩個參數對調即可。
# dd if=/tmp/floppy.img of=/dev/fd0 bs=10240
備份你的主要開機記錄磁區(Master Boot Record, MBR)
在你編輯你的磁碟分割表前,你應該要先做這個動作,如果你搞砸了才能將之復原。
# dd if=/dev/hda of=/root/hda.boot.mbr bs=512 count=1
如果真的搞砸了,你可以用 Knoppix開機,掛上含有 /root(本例中為hda1)的分割區,以下述命令置回MBR:
# dd if=/mnt/hda1/root/hda.boot.mbr of=/dev/hda bs=512 count=1
明顯地,如果你有GPT系統(如Intel MAC),這將需要一些修改。
見: http://forum.onmac.net/showthread.php?t=136
你可以用這個指令僅備份MBR而不含分割表:
# dd if=/dev/hda of=/root/hda.mbr.noparttab bs=446 count=1
將映像檔依照檔案大小作分割
When making images, it’s quite easy to run up against various file size limitations. One way to work around a given file size limitation is to use the split command.
# dd if=/dev/hda1 | gzip -c | split -b 2000m – /mnt/hdc1/backup.img.gz.
This example is using dd to take an image of the first partition on the first harddrive.
The results are passed through to gzip for compression
The -c option switch is used to output the result to stdout.
The compressed image is then piped to the split tool
The -b 2000m switch tells split how big to make the individual files. You can use k and m to tell switch kilobytes and megabytes (this option uses bytes by default).
The – option tells split to read from stdin. Otherwise, split would interpret the /mnt/hdc1… as the file to be split.
The /mnt/hdc1… is the prefix for the created files. Split will create files named backup.img.gz.aa, backup.img.gz.ab, etc.
To restore the multi-file backup, do the following:
# cat /mnt/hdc1/backup.img.gz.* | gzip -dc | dd of=/dev/hda1
Cat recombines contents of the compressed and split image files to stdout, in order.
Results are piped through gzip for decompression.
And are then written to the first partition of the hard drive with dd.
建立空白映像檔
To create an empty disk image, to be used as the disk for an emulator for example, one can get data from /dev/zero. To create a 10mb image:
$ dd if=/dev/zero of=myimage bs=1024 count=10240
A clever alternative is:
$ dd of=myimage bs=1024 count=0 seek=10240
小浪到中浪 ,氣溫 25度 , 晴到多雲
去程(1500M) : 54分29秒
回程(1500M) : 43分35秒
Total : 1小時38分5秒