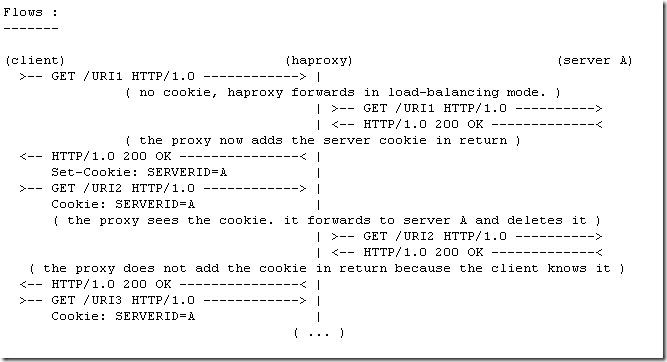
這是簡單版的架構, http flow:
其實, 裝起來並沒有想像中複雜, 只是準備一個測試環境比較麻煩些罷了–> vmware 又幫了我不少忙 😛
參考他的 online document:
http://haproxy.1wt.eu/download/1.3/doc/haproxy-en.txt
及架構圖
http://haproxy.1wt.eu/download/1.3/doc/architecture.txt
略翻完這兩個文件就可以來測試了 , 首先準備三台 web server : webA 到 webC , 然後還要一台 server 當 haproxy server 這台不用跑 apache , 安裝 haproxy 很簡單, 在 gentoo 就是 emerge –av haproxy , 設定檔要自己建 (放到 /etc/ )
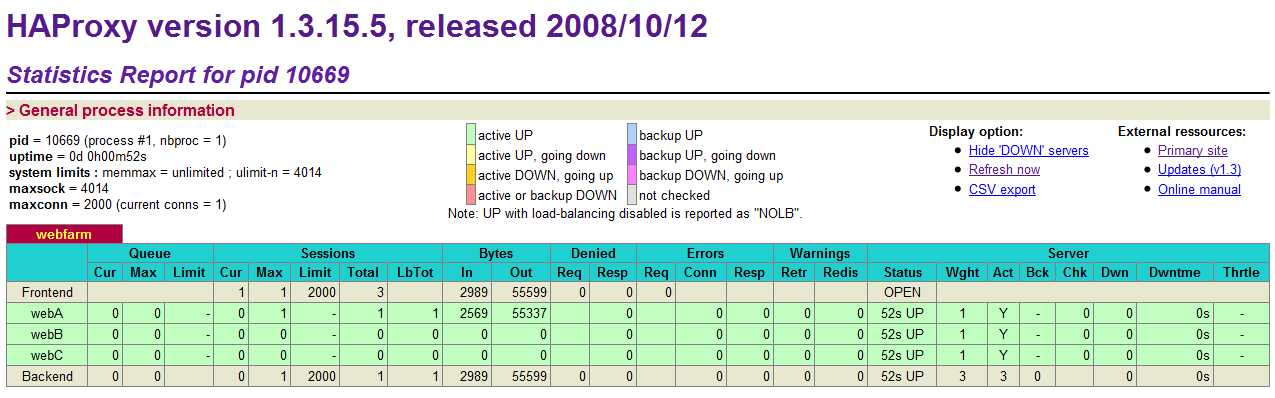
我的 /etc/haproxy.cnf
listen webfarm 172.30.0.235:80
monitor-uri /haproxy_status
stats uri /stats
stats auth admin:admin
mode http
balance roundrobin
cookie SERVERID insert indirect
option httpchk HEAD /index.php HTTP/1.0
server webA 172.30.0.206:80 cookie A check
server webB 172.30.0.227:80 cookie B check
server webC 172.30.0.228:80 cookie C check
第一次連上後, haproxy 如他的 menual 寫的 , 會丟一個 cookie 給 client , 作為下次要連的實體 server 的依據 , 我把那台 apache 停掉, 果然就連到別去了 , 然後 phpinfo 中值得紀錄的是:
SERVER_NAME 就是 haproxy.cfg 中寫的 listen 的 IP , 然後 , SERVER_ADDR 就是實體連到的 apache 的 IP , haproxy 會不停的丟 HTTP/1.0 的 HEAD 取得 apache 是否還活著.
在 webA-C 的 aapache access log 中若 沒特別改的話, 就是紀錄 haproxy server 的 IP address
….
好了! 實驗完成了!
結論, HAProxy 在他的官網寫說他:
“ 提供一個免費/快速的 HA / LOAD BALANCE 方案 , 可是我覺得他僅能夠說 HA / BALANCE (並沒有很徹底的偵測 server loading) , 並且在 SPF 方面也並沒有很好的解決辦法.
不過呢, 至少 HAProxy 比 DNS roundrobin 還好.
各種 LOAD BALANCE 方案 評估表
|
SLB |
CPU用量 |
轉送效率 |
偵測連線 |
|
roundrobin DNS |
低 |
最佳,直接傳給client |
NO |
|
ipvsadm |
最低 |
高 |
YES |
|
mod_proxy |
高 |
低 |
YES |
|
haproxy |
中 |
中 |
YES |
過了一個晚上想了想 , 即使 Citrix / Alteon / Foundry 這些 SLB hardware device 也沒有做到真正的 loading detective , 所以就一個免費又高容量的 HAProxy 來說, 算是很好的 SLB 解決方案了.
ㄎㄎ 有做過 HAProxy 實驗的都會貼這一張: