select * from v$nls_parameters

1	NLS_LANGUAGE	TRADITIONAL CHINESE
2	NLS_TERRITORY	TAIWAN
3	NLS_CURRENCY	NT$
4	NLS_ISO_CURRENCY	TAIWAN
5	NLS_NUMERIC_CHARACTERS	.,
6	NLS_CALENDAR	GREGORIAN
7	NLS_DATE_FORMAT	DD-MON-RR
8	NLS_DATE_LANGUAGE	TRADITIONAL CHINESE
9	NLS_CHARACTERSET	WE8ISO8859P1
10	NLS_SORT	BINARY
11	NLS_TIME_FORMAT	HH.MI.SSXFF AM
12	NLS_TIMESTAMP_FORMAT	DD-MON-RR HH.MI.SSXFF AM
13	NLS_TIME_TZ_FORMAT	HH.MI.SSXFF AM TZR
14	NLS_TIMESTAMP_TZ_FORMAT	DD-MON-RR HH.MI.SSXFF AM TZR
15	NLS_DUAL_CURRENCY	NT$
16	NLS_NCHAR_CHARACTERSET	AL16UTF16
17	NLS_COMP	BINARY
18	NLS_LENGTH_SEMANTICS	BYTE
19	NLS_NCHAR_CONV_EXCP	FALSE


要把這個 NLS_CHARACTERSET 改成:
9	NLS_CHARACTERSET	AL32UTF8

查 oracle 的內碼使用的是啥?

SELECT parameter, value FROM v$nls_parameters WHERE parameter LIKE '%CHARACTERSET';

PARAMETER
------------------------
VALUE
------------------------
NLS_CHARACTERSET
WE8ISO8859P1

NLS_NCHAR_CHARACTERSET
AL16UTF16


看一下 NLS_CHARACTERSET 不是 AL32UTF8

在 sqlplus 用 sysdba 進去, 下這些 commands

shutdown immediate;
STARTUP MOUNT;
ALTER SESSION SET SQL_TRACE=TRUE;
ALTER SYSTEM ENABLE RESTRICTED SESSION;
ALTER SYSTEM SET JOB_QUEUE_PROCESSES=0;
ALTER SYSTEM SET AQ_TM_PROCESSES=0;
ALTER DATABASE OPEN;
ALTER DATABASE character set INTERNAL_USE AL32UTF8;
ALTER SESSION SET SQL_TRACE=FALSE;

shutdown immediate;
startup;


環境變數
NLS_LANG="TRADITIONAL CHINESE_TAIWAN".AL32UTF8
export NLS_LANG
Month: September 2008
Codeigniter 聯接 Oracle database 要改的地方
Codeigniter version 1.6.3
Oracle version 10.2.0.4 use oci8
遇到這個 error :
Message: ocifetchinto() expects parameter 1 to be resource, null given
// 這個檔 \system\database\DB_driver.php 改成..

// $RES->num_rows	= $RES->num_rows();

if ($this->dbdriver == 'oci8')
{
  $RES->stmt_id		= $this->stmt_id;
  $RES->curs_id		= NULL;
  $RES->limit_used	= $this->limit_used;
}
$RES->num_rows	= $RES->num_rows();
解決沒有使用 UTF8 的問題
// 這個檔 \system\database\drivers\oci8\oci8_driver.php
// 改兩個地方:
function db_connect() 的
return @ocilogon($this->username, $this->password, $this->hostname,$this->char_set);

db_pconnect() 的
return @ociplogon($this->username, $this->password, $this->hostname,$this->char_set);
codeigniter 的連線設定
$db['default']['hostname'] = '//172.20.10.6/DB1';
$db['default']['username'] = "scott";
$db['default']['password'] = "*****";
$db['default']['database'] = "DB1";
$db['default']['dbdriver'] = "oci8";
$db['default']['dbprefix'] = "";
$db['default']['pconnect'] = TRUE;
$db['default']['db_debug'] = TRUE;
$db['default']['cache_on'] = TRUE;
$db['default']['cachedir'] = "";
$db['default']['char_set'] = "utf8";
$db['default']['dbcollat'] = "utf8_general_ci";
相關聯結:
http://download.oracle.com/docs/cd/B25329_01/doc/install.102/b25144/toc.htm#BABBGFIC
codeigniter 的 oracle driver 問題還不少, 同一隻程式第二個 sql select 的結果跟第一個一樣…
要改
/system/database/drivers/oci8/oci8_driver.php
的159行
if ( ! is_resource($this->stmt_id))
{
  $this->stmt_id = ociparse($this->conn_id, $this->_prep_query($sql));
}
改成
$this->stmt_id = ociparse($this->conn_id, $this->_prep_query($sql));
就夠了.
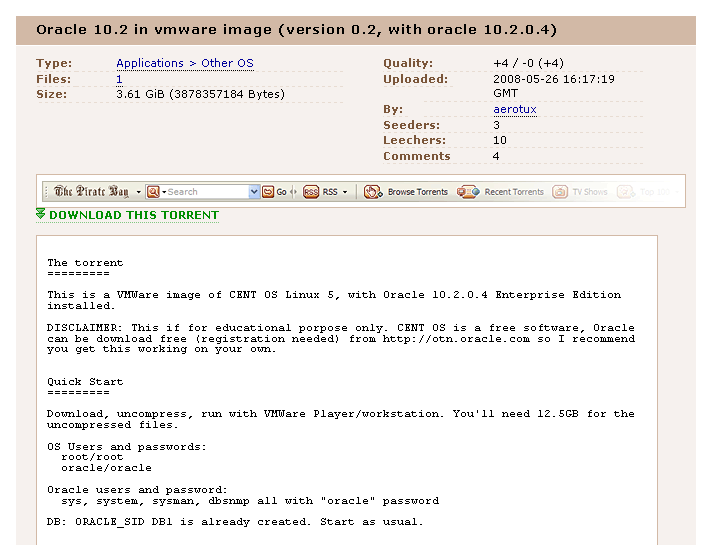
Install Oracle 10.2.0.4 using vmware image
image 從這邊抓的
http://thepiratebay.org/torrent/4206241/
裝好後的啟動 command:
Listener:
 $ lsnrctl start

Database:
 $ sqlplus /nolog
 SQL> conn / as sysdba
 SQL> startup;

DB Console:
 $ emctl start dbconsole
 then open browser and go to https://localhost:5500/em
 You can login as sys/oracle using the SYSDBA role.

sqlplus /nolog

SQL*Plus: Release 10.2.0.3.0 - Production on Wed Oct 1 18:50:04 2008

Copyright (c) 1982, 2006, Oracle.  All Rights Reserved.

SQL> conn scott/password@db1
3.2 G , 解開後, 好像有個目錄是給 Mac OS 用的 vmware image , monster 用那個看起來比較正常的 , 馬上用 vmware converter 把它轉到 Vmware ESXi server 去 , 作者建議memory不要低於 768MB , 轉好後就啟動啦.
照它的說明把 Oracle startup 很順利….. 馬上就有一個 oracle 可以用.
把那個 OS 啟動後, 依照我的環境我還改了 : keyboard , network ip address setting : 參考: /archives/1063
The torrent
=========

This is a VMWare image of CENT OS Linux 5, with Oracle 10.2.0.4 Enterprise Edition installed.

DISCLAIMER: This if for educational porpose only. CENT OS is a free software, Oracle can be download free (registration needed) from http://otn.oracle.com so I recommend you get this working on your own.

Quick Start
=========

Download, uncompress, run with VMWare Player/workstation. You'll need 12.5GB for the uncompressed files.

OS Users and passwords:
  root/root
  oracle/oracle

Oracle users and password:
  sys, system, sysman, dbsnmp all with "oracle" password

DB: ORACLE_SID DB1 is already created. Start as usual.

Read ahead for detailed instructions.

HOW TO
=======

Start the virtual machine. You can use VMWare player which is a free download. Double click on sles.vmx (don't be distracted by the name, this is not a suse linux, it's a Cent OS, but I base the configuration on a suse vm).

NOTE: Virtual machine is setup to use 768Mb of memory. I don't recommend downsizing this value, specially if using the DBConsole. Database uses less than that, so you can change it safetly to 512Mb, but the DBConsole won't probably start.

After starting the VM you should get to a graphical login.

Login as oracle and open a console. You have two ORACLE_HOMEs installed (run .bash_profile to choose one of them at any time from the oracle shell).

First home (server on /u01/app/oracle/product/10.2/db_1) is where the database is software is installed and DB1 instance was created. All oracle users (sys, system, sysman, dbsnmp) were created with the "oracle" password.

Start all with:

Listener:
 $ lsnrctl start

Database:
 $ sqlplus /nolog
 SQL> conn / as sysdba
 SQL> startup;

DB Console:
 $ emctl start dbconsole
 then open browser and go to https://localhost:5500/em
 You can login as sys/oracle using the SYSDBA role.

Second home (client on /u01/app/oracle/product/10.2/client) has the Java Enterprise Manager console installed. This is a client/server tool to admin the database (works for previous releases too). From 11g this tool is no longer provided, but since it's very popular as of today, I'm installing it here. Start it with $ oemapp dbconsole (just type oemapp to see all products available).

Listener only listen on localhost (127.0.0.1). To access the database from your network you'll have to make sure that VMWare networking is working properly. By default it's configured as "Bridged networking" (see vmware docs for details) and inside you see the network card as eth0, configure with DHCP. Once you can ping the box you can modify the listener.ora file and add the new IP to listen to, and restart it. DBConsole configuration to listen on that IP can be a bit tricky (try setting the iP on the ORACLE_HOSTNAME env var and then reconfigure with emca -reconfig dbconsole db). You can also access it with SSH port fowarding if you know how to do it.

Changelog
=========

Version 0.2
  * Upgraded soft to 10.2.0.4 (db too)
  * DB Console working.
  * Linking of soft now works becouse of install of libstdc++.so.5
  * Better "documentation" with torrent.

Version 0.1

  * First release: Vmware image with CentOS 5, xfce4, and oracle 10.2.0.3 (server and client). DB1 already created.
  * Known bug: dbconsole not working properly.
  * Posted on http://thepiratebay.org/tor/4039509/Oracle_10.2_in_vmware_image

Help
====

You can post questions on the comments, althought I don't see them so often, but maybe somebody else can help you.
If you need oracle support, you can search the web for help or you can have professional support from us by an email on the comments (good prices, senior dbas).
install oracle instant client basic on gentoo linux step by step
emerge -av dev-db/oracle-instantclient-basic dev-db/oracle-instantclient-sqlplus
—
!!! dev-db/oracle-instantclient-basic-11.1.0.7.0 has fetch restriction turned on.
!!! This probably means that this ebuild's files must be downloaded
!!! manually.  See the comments in the ebuild for more information.

 * Please go to:
 *   http://www.oracle.com/technology/tech/oci/instantclient/index.html
 * select your platform and download the
 * Basic client package with SDK, which are:
 *   instantclient-basic-linux32-11.1.0.7.zip
 *   instantclient-sdk-linux32-11.1.0.7.zip
 * Then after downloading put them in:
 *   /usr/portage/distfiles
—
在
http://www.oracle.com/technology/tech/oci/instantclient/index.html
抓
factory ~ # cd /usr/portage/distfiles
factory distfiles # ls -l *zip
-rw-rw-r-- 1 apache portage 34556803 Aug  6 17:17 instantclient-basic-linux32-10.2.0.3-20061115.zip
-rw-rw-r-- 1 apache portage   602897 Aug  6 17:17 instantclient-sdk-linux32-10.2.0.3-20061115.zip

emerge -av dev-db/oracle-instantclient-basic
#
—
USE="apache2 berkdb bzip2 calendar cjk cli crypt ctype curl gd gdbm hash iconv json mysql mysqli nls oci8-instant-client pcre reflection session simplexml sockets spl ssl tokenizer truetype unicode xml xmlreader xmlwriter zlib" emerge -av php
最簡單的最好 – 用 pre 的 CSS style
CSS 是這樣的
pre {
  background: #F0F0F0 url(images/blogger-code.gif) repeat-y scroll left top;
  border: 1px solid #CCCCCC;
  color: #333333;
  display: block;
  font-family: Courier New;
  font-size: 8pt;
  line-height: 120%;
  margin: 5px 0 0 20px;
  max-height: 200px;
  overflow: auto;
  padding: 10px 10px 10px 21px;
  width: 90%;
}
完全不用 javascript , 直接寫到 wordpress 的 style.css 裡 , 要用時就直接用 html pre tag 就好, 比上次找的
SyntaxHighlighter Plus 還方便, 雖然沒有 syntax highlight , 不過就是簡單, 再說 blog 上面也不適合放一大串的程式碼不是嗎?
// sample code :

for ( $i=0; $i<10; $i++ ) {
  // do something
}
[轉貼] 多!?
學多懂多,懂多煩多,煩多想多,
想多做多,做多付多,付多拿多,
拿多花多,花多吃多,吃多病多,
病多-日子不多,最好還是別管那麼多,開心多多!